I had taken an acoustic guitar building class at Red Rocks Community College in Colorado. After completing that course with my son I enrolled in the electric guitar building class also. For the class I had designed a swamp ash body with a 1/4 inch ebony drop top. When I ordered the top I asked the clerk to find the most 'flamed' she could find. I wanted the cream streaking through the ebony. I ordered a maple neck which will also have an ebony fingerboard on it. I had considered making the neck out of ebony but I remembered someone in class who tried to do a neck out of Rosewood and it didn't look fun. Knowing that working with ebony can be challenging I decided to go with Maple to hopefully counter act some of ebonies dampening effect.
.
Unfortunately I had an accident with a table saw and had to cancel the class. The class was to start in late January and I hurt myself early in Jan. The materials sat in a box (in a room with a humidifier) for about 8 months. I thought instead of enrolling in the class I would try to do it myself. I had the DVD and have done modifications on guitars before. I quickly found out that I didn't have the tools I needed. Mainly a band saw and belt sander. I called around and found a wood shop that would do custom work. Initially we had looked at doing a CNC Router but I could not obtain the digital license to do so.

So I asked the wood shop to join the Ebony to the Swamp Ash and reduce it to 1 3/4 inches. I also instructed them to transfer the shape to the wood and using a band saw cut to within a quarter inch. They were surprised at the 1/4 inch. I may regret it but we will have to see. I wanted to be able to carve the guitar without fear of getting to small. I have not yet made an electric from scratch so we will see what we end up with... (update, if I did not obtain the band saw
I would have greatly regretted it. I would say next time 1/8 or 1/16th of an inch. But because I had a band saw I was able to trim it up quickly)
.
I was contemplating doing an inlay on the body. I was not sure what I wanted so I decided to cut up some of the scrap to get a feel for the wood and how it inlays. I had the headstock left over from the vine inlay since I was going to use the trinity with it. So I decided to go ahead and inlay with the vine headstock. Nothing else I would have a very pretty paper weight...
Like all inlay, my first step was to apply whiteout and scribe it. I spread the whiteout nice and thick then assemble the pieces together and apply a little downward pressure so that it sticks. While not perfect, this has been the best method for me so far. I bought the scribe from Stewart McDonald, while not entirely necessary, I must admit it has been a nice accessory.
Using my Dremel router I then remove the wood and fit the pieces. I have been getting better at the fitting part. Again I found if I do a good job on the scribing, the fitting goes much smoother.
I have been struggling with the size of the bit, the thin is so thin, they burn out very quickly. The next step up I have is just a hair too roomy for the vine. So I have been using my medium to do thicker parts of the vine and the leaves. I then can go in with the thin bit and tidy up. When I have to cut a vine using the thin, there is usually smoke and some burning. I then have to shave the side with the bit or us a chisel
.
Regardless, once all routed time to mix up some epoxy. I was using clear epoxy mixed with ebony wood shavings, which was working fairly well. It was causing a lot of air bubbles though. I bought a bottle of the pre-mixed with black dye. It seems to work well, less bubbles, good color, but it dries slower and has more of a gummy texture when first dried. It seems to do fine with sanding so...
Here it is with sanding in progress with 80/120 grit. There is still some epoxy on the top of the vine so I will switch over to 220 then 400 then 800 then do a French Polish on it. I will have to stop my French Polishing for awhile. The next few steps are going to produce a lot of sawdust...
I decided since this was my first electric guitar from scratch I would follow the blue prints that came with the kit from LMI. It was a design from Robbie O'Brien from O'Brien Guitars. He was also my instructor when I took the acoustic guitar making course at Red Rocks Community College. The design is an interesting one. It takes from both the Fender Stratocaster (with the two prominent horns and easy fingerboard access) and the Gibson Les Paul with the large solid body, rear control cavity and two double humbuckers. I like this design a lot, but if I do a second I will cut down on the thickness, 44.5 mm is pretty large and with the 1/4 inch of ebony it rivals any Les Paul in weight. If I had a planer I could bring it down. I have a hand held belt sander but am afraid of uneveness. I don't have to commit right now. Once I rout the top lip of the control cavity then I am committed.

I took the plans and cut out the guitar body. I glued that to a 1/4 inch press board and let it dry for a day. I then took it to the band saw and cut out the general shape. I have recently purchased a robo-sander for the drill press. I then finished it using the sanding bit in the drill press. I then cut out the humbucker cavity using a Forstner bit then a scroll saw and finishing up with sand paper on a stiff block. I used the Forstner bit to drill out the holes for volume, tone and pickup switch. I then screwed the template to the op of the guitar body. Now that I had the template I could push the body into the drum sander and the bushing would hit the template when it was done. Same concept as routing with a template. I was able to get a fairly good body shape, I will have to do some touch up on some areas that broke out a bit but all in all a fairly efficient way to make sawdust.

The next step was to drill out the humbucker cavities. There are several ways to accomplish this. I used Forstner bits to remove the bulk of the wood. I started out with the small diameter bits and went down exactly 3/4 of an inch down.
Then I came in with progressively larger diameters until I cleared the area pretty well. As you can see the Forstner made quick work of the area. This part was fairly easy but I went very slowly since this was my first time. I measure 4 times before I cut knowing that every move is irreversible.
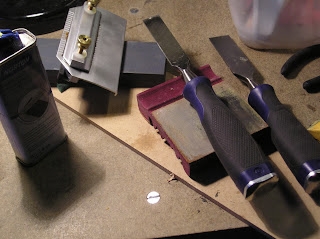
So I took a break to sharpen up the chisels :-) I haven't used them in awhile. They were still pretty sharp but I wanted to practice my sharpening skills so they got a nice razor edge to them. I will usually regrind them fine/extra fine then put a nice edge using the strop. Every time seems better, so I just keep doing it every now and then.
Now that my chisels are nice and sharp I can go in and clean up rather easily. The template provides a nice demarcation and support. The ebony though is very hard and prone to splintering or chipping. The Swamp Ash is rather porous and soft. So the trick has been enough power to get through the ebony but not out of control in the Swamp Ash.
All of this work has created a very pretty but omnipresent saw dust and shavings... Sort of a chocolate/vanilla. The shop does smell really good with the ebony, i love that smell.
Now that I have the humbucking cavities drilled out and cleaned up I can take the template cover off. The Guitar looks large to me at this point. That's a lot of wood... I am very curious about the tonal qualities once I am done. I am holding myself to building it to plans first then I can modify after. I do think with a proper french polish this will be a stunner. I also like Swamp Ash tone, at least the airy part if not the higher tones so I am very curious to how the ebony top will effect tone. I had purchased a whammy bar bridge but am reconsidering. The plans show a six screw face plate bridge. I love the two post (tunamatic) bridges so would consider modifying that. But we'll see, I did say I was holding myself to building it to plans first then modifying...

Now I need to drill the rear control cavity. Personally I like the rear control cavity better than the strat design simply because it shows more wood. I love the look of wood and a good finish. The Stratocaster pickguard covers over 50% of the surface area. I created a rear control template out of mdf.
Again using the Forstner Bits I start removing wood. The width of the Guitar is about 44.5 mm. I need 4 mm of wood left for the shaft of the pots to go through. 4 mm is not a lot of room for error, and if there is a mistake here, it could be un-recoverable. You are relying on your math and your measurement at this point. So I went in stages, drilling to 35mm, measure, 37mm, measure, you get the picture.
My intention was to leave a bit more than 5 mm of wood and work from there. This wood is fairly 'soft' and smokes easily if you don't watch it. The Forstner bits make quick work of the main outline out of the control cavity.
I am glad I sharpened my chisels. I can now go in with chisel and mallet and clean up the outline. The work goes fairly quickly. There will be two potentiators or "pots" and a switch to engage the neck and/or bridge pickups. The shafts are about 5 mm with the washer so I will have to take a little more off but want to finish sanding the front before I make the decision of how much. I can expect to take 1 - 2 mm off the ebony when I am done.
Here is the cavity routed and chiseled. Now using the sanding drum on my drill press, I will sand it smooth. Once I am done with that I will need to route the 'lip' so it sits flush in the back. I haven't decided what material I will make the back cover out of yet. Maybe I will ask my wife to design something in polymer.


 Now that my chisels are nice and sharp I can go in and clean up rather easily. The template provides a nice demarcation and support. The ebony though is very hard and prone to splintering or chipping. The Swamp Ash is rather porous and soft. So the trick has been enough power to get through the ebony but not out of control in the Swamp Ash.
 All of this work has created a very pretty but omnipresent saw dust and shavings... Sort of a chocolate/vanilla. The shop does smell really good with the ebony, i love that smell.
 Now that I have the humbucking cavities drilled out and cleaned up I can take the template cover off. The Guitar looks large to me at this point. That's a lot of wood... I am very curious about the tonal qualities once I am done. I am holding myself to building it to plans first then I can modify after. I do think with a proper french polish this will be a stunner. I also like Swamp Ash tone, at least the airy part if not the higher tones so I am very curious to how the ebony top will effect tone. I had purchased a whammy bar bridge but am reconsidering. The plans show a six screw face plate bridge. I love the two post (tunamatic) bridges so would consider modifying that. But we'll see, I did say I was holding myself to building it to plans first then modifying...
 Again using the Forstner Bits I start removing wood. The width of the Guitar is about 44.5 mm. I need 4 mm of wood left for the shaft of the pots to go through. 4 mm is not a lot of room for error, and if there is a mistake here, it could be un-recoverable. You are relying on your math and your measurement at this point. So I went in stages, drilling to 35mm, measure, 37mm, measure, you get the picture.
 I am glad I sharpened my chisels. I can now go in with chisel and mallet and clean up the outline. The work goes fairly quickly. There will be two potentiators or "pots" and a switch to engage the neck and/or bridge pickups. The shafts are about 5 mm with the washer so I will have to take a little more off but want to finish sanding the front before I make the decision of how much. I can expect to take 1 - 2 mm off the ebony when I am done.


No comments:
Post a Comment